Click to view our Accessibility Statement or contact us with accessibility-related questions


Showing 1 of 18 conversations about:

Moneigh
24
Sep 13, 2018
bookmark_border
I am extremely surprised by the number of people commenting on this product, which makes me curious enough to ask here: would anyone be able to layout a quick recommendation for someone (me) who would be interested in very precisely etching away the anodized layer on titanium and/or aluminum? No engraving of the actual metal is necessary; looking to eat away the surface oxide back to bare titanium.
charliesean
26
Oct 9, 2018
bookmark_border
MoneighI use HF to etch titanium. It removes the anodization layer or whatever finish is on the titanium.
HF acid is some nasty nasty stuff so be sure to do some research - too big a splash will kill you in the most painful way if you don't have any calcium gluconate around, something about fluoride being attracted to the calcium in your bones and it anesthetizes the affected area so you won't feel it burning and symptoms arrive hours or days later.
You can find hydrofluoric acid at Walmart if you live in a state where it is not controlled. Look for Whink Rust Remover and make sure the back of the bottle says hydrofluoric acid. It can also be found in some auto parts shops as a rim or hubcap cleaner. These products are dilute concentrations of HF but is still extremely dangerous and even exposure to the fumes is deadly.
To etch titanium make sure that you completely clean the work piece of oils and grease with anything except for chlorine which has a nasty reaction with the HF. Get some Calgonate, plastic safety glasses, 2 plastic containers, a bucket, distilled water, baking soda, nitrile gloves, and some plastic straws or heavy nylon fishing line - HF will eat everything except plastic.
Put the gloves on (I use 2 on each hand) and then tie straws or the line to your oil-free workpieces but do not use metal wire only plastic or nylon. Fill one of the plastic containers with water and fill the bucket with the rest. Add a spoon or two of baking soda to that plastic container and dump the rest in the plastic bucket.
Put enough Whink solution to cover your workpiece and dip each, one at a time, in the solution, and watch the colors go "backwards" until the workpiece is a dull gray. Don't leave it in there after it turns gray, slowly pull it out and drop it in the plastic container with the water and baking soda. Repeat this until all your workpieces are etched.
Don't breathe the fumes. Don't splash the liquids. Pay very close attention to what you are doing.
Once you finish etching your workpieces, stick your gloved hands in the bucket and then dry them off. Now carefully take the acid container and slowly pour the acid in the bucket and finally put the plastic container in the bucket. What we are doing is neutralizing the acid for disposal. When the fizzing stops, it should be safe to dispose of, you can use ph strips to test. Check your local laws, you may need to dispose the stuff at a licensed facility otherwise I keep adding baking soda until ph is at 7 or higher and then put it down the drain. After your personal safety, ensuring this stuff is disposed correctly should be a priority. The bottle of Whink should also be kept in some kind of plastic bag or container and reasonably away from valuables, other chemicals, and children after using it. Make sure the cap is on tight.
If you are not going to immediately anodize, fill up another cup or a bag with water or rubbing alcohol and keep your workpieces submerged to avoid prolonged contact with air which will make the colors dull when you anodize.
Should any of this stuff get on you, immediately flush with water and then rub copious amounts of Calgonate on the area. What this does is tricks the fluoride into absorbing the calcium from the Calgonate instead of your bones. Then head on over to the emergency room and make sure that you tell them you spilled HF acid on you.
Have fun and try not to kill yourself.
P.S. Don't do this with aluminum unless you have a death wish.
cyph3r
20
Oct 9, 2018
bookmark_border
charlieseanHF is a seriously dangerous compound. Its not for home use and definitely not recommended for DIY projects. Don't do this at home! HF is toxic and is absorbed through the skin. You can seriously and permanently damage your body (by creating CaF as insoluble precipitate resulting in fluorosis and hypocalcaemia) and you can die from overexposure. HF can react violently with many compounds or elements and can result in explosive hydrogen gas formation.
https://simple.wikipedia.org/wiki/Hydrofluoric_acid
To handle this compound properly you need training, specialized personal protective equipment and a suitable handling facility.
To handle this compound properly you need training, specialized personal protective equipment and a suitable handling facility.
charliesean
26
Oct 9, 2018
bookmark_border
cyph3rYeah I try to be careful.
Since the HF I am describing comes in a 1% solution sold over the counter at Walmart in the form of a rust remover, I'm going to have to call BS on the special training and handling.
Because anodization is basically oxidization (rust) and using a rust remover to remove rust is well within acceptable use. The fact that it happens to be a nasty chemical with horrible side effects just means that precautions must be taken when using this stuff.
I've done my due diligence and disclosed the dangers of this stuff in succinct layman's terms to avoid any possible confusion.
As a responsible adult I work with this stuff at my own risk and ensure that it is properly neutralized and disposed of.
Moneigh
24
Oct 10, 2018
bookmark_border
charlieseanI do have full chem gear and plenty of sense regarding hazardous substances due to my proximity to some not-so-lovely things at work; however, I don't think using a chemical means to remove the layer will suit my needs. I'm looking to remove the layer extremely precisely and only in specific positions. I'm capable of g-code, and hence was hoping for a CNC laser solution (but the reflectance of the material and other factors make me wonder if lasers would work at all)
On another note, I very much appreciate the detail in your response regarding your methodology, and I might try it with a separate project if I find a suitable need.
On another note, I very much appreciate the detail in your response regarding your methodology, and I might try it with a separate project if I find a suitable need.

charliesean
26
Apr 8, 2019
bookmark_border
charlieseanWow! Thanks for all the endorsements, I had no idea people would actually read this.
So here is an update. The other week my city's supply of HF acid aka Whink Rust Remover completely ran out. Some stores replaced it with the Whink Calcium and Lime Solution with the green cap but this is completely useless for etching titanium.
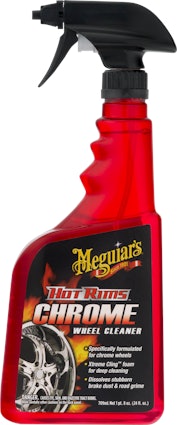
Then I remembered hearing about ammonium bifluoride being able to etch titanium when in a solution with another acid (forgot name) at ambient temperature so it was off to the Wally World and the Big Box supermarket and drug stores. I picked up every bottle of anything that remotely resembled a bottle of liquid and started reading the labels to find what I was looking for. Which really weirded out the other people shopping in the store for some reason, they probably thought I was cooking drugs or something. After a good while I ended up in the automotive department and the first thing I saw was a big neon read bottle so I grabbed it and started to read.
HOT RIMS CHROME WHEEL CLEANER
Contains phosporic acid, nonionic surfacant, hydroxyacetic acid, glycol ether, ammonium bifluoride.
Drop Refurbished
Like-new products you can trustDrop Rewards
Get $5 for every 500 points you earn! Learn more
Drop Keyboard Club
Become a member and expand your keycap collectionCollaborate With Us
For Brands & DesignersFollow Drop