Click to view our Accessibility Statement or contact us with accessibility-related questions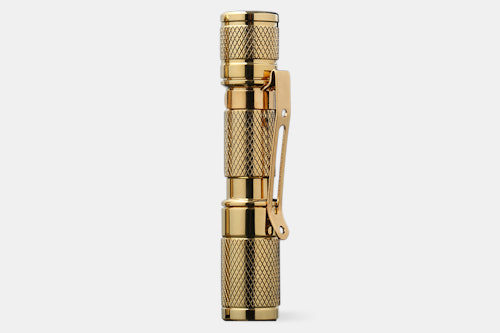
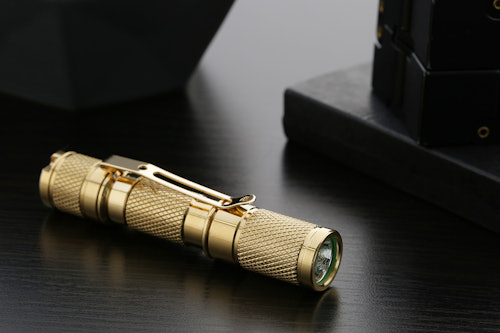
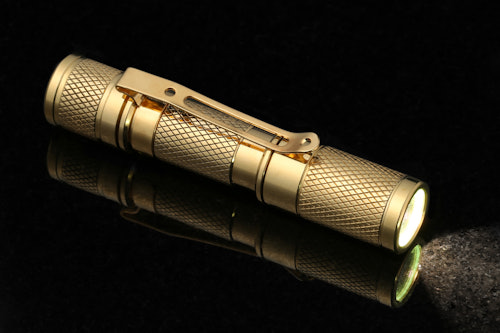


Drop Brass AAA Pocket Flashlight
01 / 11
Drop Brass AAA Pocket Flashlight
bookmark_border
Where's the price?
To negotiate the best possible price for our customers, we agree to hide prices prior to logging in.
632 requests
·
Free Returns in USA
Product Description
Made for the EDC Community, the Massdrop Brass AAA Pocket Flashlight is about the size of a tube of chapstick—but it pumps out 110 lumens and casts a beam as far as 154 feet (with the CREE XP-G2 R5 LED). Despite measuring less than 3 inches long, it weighs 1.5 ounces for a substantial feel in the hand Read More
You Might Also Like

Specs
- Material: Brass
- Titanium button piece
- Max beam distance: 111 ft (34 m)
- Battery: 1 AAA
- Removable, reversible, gold-plated pocket clip
- IPX-8 waterproof
- 1.5 m impact resistant
- Working voltage: 0.9 – 1.5V
- Dimensions: 2.9 x 0.6 in (7.4 x 1.5 cm)
- Weight (with battery): 1.5 oz (42.5 g)
CREE XP-G3 LED
- Max beam intensity: 553 cd
- Max beam distance: 154 ft (47 m)
- Low mode: 5 lumens, 36 hrs
- Medium mode: 32 lumens, 4 hrs
- High mode: 110 lumens, 30 min
Nichia 219C LED
- Max beam intensity: 304 cd
- Max beam distance: 111 ft (34 m)
- Low mode: 3 lumens, 36 hrs
- Medium mode: 20 lumens, 4 hrs
- High mode: 85 lumens, 30 min
Included
- Plastic case
- Spare O-rings
- 1-year warranty
RETURNS—NO QUESTIONS ASKED
We get it. Sometimes what you ordered just doesn’t work out. If that’s the case for you, don’t fret! All customers (both US and international) may return this item in new, unused condition within 30 days of delivery.
Shipping
Domestic (contiguous US) customers will have a choice of shipping options at checkout. The shipping days / arrive by date displayed represent the transit times from the estimated ship date for your order to be delivered.
Estimated ship date is Dec 16, 2020 PT.
Payment will be collected at checkout. Cancellations are accepted up to 2 hours after checkout for in-stock items, or up until pre-order ships.
Recent Activity


Related Products

Drop Refurbished
Like-new products you can trustDrop Rewards
Get $5 for every 500 points you earn! Learn more
Drop Keyboard Club
Become a member and expand your keycap collectionCollaborate With Us
For Brands & DesignersFollow Drop