Click to view our Accessibility Statement or contact us with accessibility-related questions


Showing 1 of 675 conversations about:

kenwstr
121
Jan 25, 2020
bookmark_border
When I setup my Dan Durstan X mid 1p, I found that the fly has an extra loop on 3 sides, presumably for extra peg outs. Just wondering what this is not on all 4 sides. Anybody else found this, is it perhaps a mistake?
Ken
dandurston
5116
Dan Durston
Jan 26, 2020
bookmark_border
kenwstrThere should be a small grosgrain loop on all four sides as an optional extra stake out point. If yours is missing that on one side, it appears that it was missed being added at the factory. If you get it touch with Drop they may be willing to help you out.
kenwstr
121
Jan 26, 2020
bookmark_border
dandurstonThanks for confirming that Dan. I had difficulty finding how to contact Drop, finally did but only received an automated message so far. Given postage charges, I may just sew in a grosgrain loop myself what is the colour name?
(Edited)
dandurston
5116
Dan Durston
Jan 26, 2020
bookmark_border
kenwstrSorry about the mishap and hassle. Yeah it can be a bit tricky to figure out how to get in touch. The normal method is to go your profile and then "transactions" -> "delivered" and then at the bottom of each order is a "contact support" link.
Those loops are dyed a "desert sage" like many other ascents, so yeah it would be tricky to match that. Black or light grey would likely be the best if you do add one yourself. If you do want to actually perfectly dye some grosgrain, the pantone color is 16-0110. I can't speak for Drop, but perhaps they may offer to compensate you a bit to alleviate the situation without you having to send it in.
Some people use these guyouts to compensate for a poor pitch (e.g. their rectangle isn't square so a side is loose but instead of fixing the rectangle they just pull out the slack via one of these guyouts) but it's best to focus on dialing in the core pitch. With a good core pitch, I've never used the extra guyouts on the smaller end walls, but I do use the ones on the longer walls in high winds or when there is snow-loading.
(Edited)
kenwstr
121
Jan 27, 2020
bookmark_border
dandurstonSo fantastic, thanks very much Dan. The missing loop is fairly trivial IMO, a detail easily missed, easily rectified and hardly worth a return over. Handy to peg out the side in a blow though. I'll try the dye just to keep it looking spiffy. Thanks again.
PS, I came up with a way to get it square 1st time every time, no guessing.
After pegging out the short edge, hold the other 2 corners together and stretch out to make a triangle.
The apex is on the ground centre line and the doubled edge gives you the middle of that edge.
Aligning the middle of the edge with the ground centre line, makes the remaining corner peg outs square.
dandurston
5116
Dan Durston
Jan 27, 2020
bookmark_border
kenwstrThat's a really clever method. Makes sense. I'll try it out.
DuskyBay
11
Jan 28, 2020
bookmark_border
kenwstrThat technique for getting a good rectangle works really well. I’ve found that pre-marking the centre of the short sides with tape or pen/pencil and temporarily marking the apex of the triangle on the ground with a peg speeds up the process. Great suggestion.
dandurston
5116
Dan Durston
Jan 28, 2020
bookmark_border
DuskyBayI've wavered on where to put those extra grosgrain guyouts on the short sides. Right now they are directly below the peaks, but it seems to work about the same if they were to be in the center. So perhaps it might be a good tweak to move them over to the center where they could also be used as a pitching aid when using this technique.
kenwstr
121
Jan 29, 2020
bookmark_border
dandurstonI found the current position convenient to provide a tie point for the short flap when the door is unzipped. I bring the small flap inside the fly to attach to the short side peg. The existing peg point is in exactly the right spot for this and doesn't distort the pitch when taken inside the fly.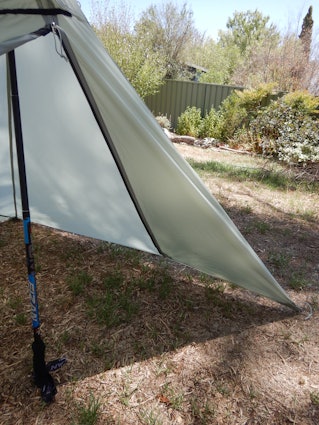
(Edited)
dandurston
5116
Dan Durston
Jan 29, 2020
bookmark_border
kenwstrMakes sense. I'd try it here but we have a few feet of snow on the ground which complicates things. I'll give it a go in a few weeks when the snow has melted.
That's neat about connecting the small side of the door there. I guess that makes sense that it works because the pole is set back 25" from both the side and end walls, so it should be 25" from the corner to both the door zipper and end panel extra stake out.
Another neat thing this extra stake point allows is a "compact pitch" with a smaller footprint by collapsing one or both vestibules. The easiest way to imagine this is to start with a normal 4 stake pitch. If you then deploy a peak guyline along the steep corner seam, then you can unstake that corner without the tent falling down. Of course that leaves two of the sides and the floor loose, so then you stake the extra stake spot along the end wall which is at the corner of the floor so it holds the floor out properly and pulls most of the end wall tight. Then you take that corner stake that you undid and clip it over to the end panel stake. That roughly pulls the doorwall tight. There's still some billows of loose fabric so it's not photogenic nor suitable for a storm, but normally you would be using this technique to fit into a tight spot in the forest where high winds are not a concern.
Of course if you were actually doing this pitch for real, you wouldn't be able to start with the normal pitch (or you'd just do that). So to actually do it you basically need to stake out the funkier base shape (basically the floor shape if you are collapsing both vestibules) and then insert the poles and support them while you deploy the peak guylines.
(Edited)

rel406
30
Jan 29, 2020
bookmark_border
dandurston@dandurston At first I liked the idea of moving the short side loop to the center in a future tweak, but I had forgotten about the compact pitch option. This and the door tieback trick that @kenwstr shared would suggest that it's in the perfect spot as is. Moving it would forfeit both of these advantages to only gain a small setup advantage.
My 2 cents would be to keep it as is.

NicksOvenSocks
18
Feb 19, 2020
bookmark_border
kenwstrJust checking to see if you created a video of this pitch method... Very curious. Thanks!
kenwstr
121
Feb 19, 2020
bookmark_border
NicksOvenSocksSorry, not yet. Honestly, I am probably not much good at video presentations but I may as well give it a go anyway. Just been a bit preoccupied. I'll try to get onto it this week and if it turns out semi OK, I'll post it.
kenwstr
121
Feb 19, 2020
bookmark_border
kenwstrOK, I shot a silent video today, too windy for dialogue, besides I haven't scripted that yet. It may give the general idea with a bit of thought. I'll still try for dialogue, let me know if this isn't clear as is. Please keep in mind, this is the 1st time I have attempted to upload video to youtube so I am completely unfamiliar with producing videos and don't have any video editing software, other that just basic trimming in windows Photos editing.
After pegging out the corners of one short edge:
1:28 I have the other two corners held in left hand to form the apex of a triangle.
1:33 As the short edge is doubled, I pinch the center of that edge in my right hand.
1:41 Make both long edges taught so the apex in left hand is on the center line of the tent.
1:42 Align the center of the short edge (right hand) in line with and about 6" / 15cm beyond the apex.
1:45 Stretch out one of the corners while holding the center of the short edge in place.
1:50 Peg that corner down
2:07 Stretched out and peg down the last corner.
Note: There is no need for accuracy in that 6", whatever your rough guess is will be just fine.
https://youtu.be/5aNTuurDEFE
Edit: Closed Captions have been added.
(Edited)
kenwstr
121
Feb 19, 2020
bookmark_border
dandurstonTa Dan, Massdrop had a piece of the correct colored grosgrain sent out for me to add the missing loop. I suggested this and they did it which is an excellent cooperative, practical and inexpensive solution that I am very happy with.
NicksOvenSocks
18
Feb 19, 2020
bookmark_border
kenwstrThanks for taking the time to shoot and post this video, Ken. I'm goin to try this method today.
dandurston
5116
Dan Durston
Feb 19, 2020
bookmark_border
kenwstrGlad you were able to get it resolved in a manner that works well for everyone.
Drop Refurbished
Like-new products you can trustDrop Rewards
Get $5 for every 500 points you earn! Learn more
Drop Keyboard Club
Become a member and expand your keycap collectionCollaborate With Us
For Brands & DesignersFollow Drop