Click to view our Accessibility Statement or contact us with accessibility-related questions


.ico?auto=format&fm=jpg&fit=crop&w=30&h=30&dpr=1&q=70)


Massdrop 101: Getting Started With Fountain Pens

search
close
Sort by: Newest
keyboard_arrow_downwh1Tn3Y
0
Sep 26, 2019
It was undoubtedly the squid ink pasta with squid in its own ink sauce that has inspired this new potential passion that I can see could easily get out of hand. Thank you for a thoughtful, comprehensive and seductive overview into yet another esoteric labyrinth.
Ghostwriter
99
Sep 12, 2019
From the Sink Method blurb:
Sink Method: Disassemble your pen near your sink or cleaning station and empty the ink. If the pen is full, you can try emptying the ink back into the original bottle or another small vial to save it for future use. If you’re not worried about that, you can simply empty it into the sink. Next, hold the nib section under running water until the water runs mostly clear. This is the fastest way to flush your pen, and for pens that are properly maintained and haven’t accumulated buildup or debris, this step may be enough.
> If the pen is full, you can try emptying the ink back into the original bottle...
Please note that doing this may introduce contaminants into your beloved ink bottle, which in turn could promote fungal growth and other nasties. Best not to put ink back into a bottle. As an aside, I use a blunt-tipped syringe to pull ink from the bottle for filling - none of my pens ever come into direct contact with a full ink bottle.
Tip: For the sink method, it is recommended that a stopper be placed over the drain hole while cleaning so that disassembled parts don't find their way down the drain. Feeds, nibs, rings, and o-rings can easily find their way to a dark place otherwise.
RandyBrown
1486
Oct 25, 2017
Ordered another low cost fountain pen on Amazon and it arrived today. It’s a Wing Sung 698 Piston (demonstrator), I paid about $21 for it. Came with a fine gold nib installed, an inexpensive felt pen case, and an extra converter mechanism. I loaded the pen with Pilot Iroshizuku yu-yake (burnt orange) ink without hesitation and all went very smoothly. The nib glides across the paper with silky smoothness. The end cap which pumps the piston actually snaps and locks down when done - this prevents accidental jarring of the end cap and piston when handling the pen. The cap seems to post securely and has yet to come loose. I love the translucent feed, it’s just another touch of eye candy that helps complete this near 100% clear demonstrator fountain pen. This is my first demonstrator and so far I’m enjoying it. Next on the buy list is the TWSBI Mini AL Gold.
Theroc
2318
Keyboard Club Member
Oct 26, 2017
RandyBrownYes, the 698 offers more fountain pen for your dollar than anything else. If the brand name said Pilot or Lamy it would have topped everyone's fountain pen lists.
I posted about it comparing it to TWSBIs and the Custom 92 here:
https://www.massdrop.com/talk/1503/piston-filler-demonstrators
RandyBrown
1486
Oct 9, 2017
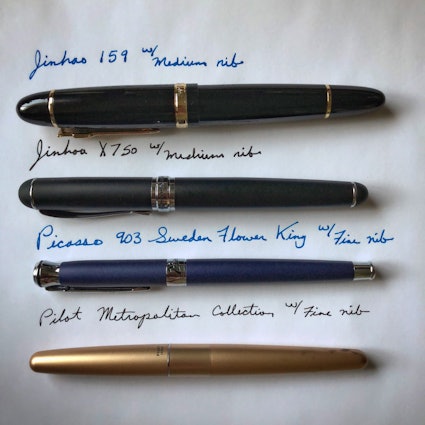
I posted some time ago that I had picked up aJinhao X750, well now I‘ve settled in with a total of four pens. To recap, after 4 decades of not writing cursive I’ve picked it back up. It’s going to be a long journey but I’m up to the challenge. I’m learning all over again with the help of a few inexpensive fountain pens that didn’t break the bank. The Jinhao 159 because it’s big and bulky. The previously mentioned Jinhao X750 which is middle of the road size-wise. The Pilot Metropolitan which seems to be just a bit smaller than the Jinhao X750. And finally the Picasso 903 Flower King because it’s kinda narrow and slim. Both the Jinhao’s have medium nibs and both the Pilot and Picasso have fine nibs. In a few weeks I’ll buy new nibs and swap-out the current nibs on each of these pens for larger or smaller nibs to see if my writing is better or worst with nib changes vs. sizes of pens. Perhaps by next year I will have figured out what size, type, and brand fountain pen is best for me, then start my collection from that point.
MountainPass
223
Sep 26, 2017
Here's a nice video that shows the different filling methods in action:
https://www.youtube.com/watch?v=dNSOyoGlfug
RandyBrown
1486
Aug 27, 2017
After using inexpensive ballpoints all my life and recently $7-$10 gel-pens by Pentel, Pilot, and others I finally took a step towards the world of fountain pens. I ordered a Jinhao X750 in frost black with a medium nib on Amazon for only a few dollars as well as a 3oz bottle of Noodler's black waterproof (Bulletproof) ink. The nature of my employment has caused my penmanship to suffer over the past 3+ decades and I intend to reclaim the cursive style of writing I abandoned many years ago. I know that low-cost fountain pens are sometimes frowned upon by more experienced fountain pen users but I just want to make sure I learn the basics without a sizable first cash investment so for just over $20 I think it's a good move. The Jinhao and ink will arrive in another day or so but before then I'll need buy a simple starter writing pad or notebook best for use with a fountain pen…any suggestions?
RussPa53
3
Sep 6, 2017
I use at least a Medium point on all my pens but 2. I've found that paper that goes over 90 gsm, and for me, preferably over 95 gsm, is best. That does run up the $$$ - you could save by going to lower gsm if you only use one side. As far as I've been able to discover, your usual laser paper, usually called "20 pound" paper = approximately 75-80 gsm . I have a journal at 120 gsm, and there's absolutely no bleed-thru to the other side.
ac12
11
Jan 22, 2017
The tip of the nib is a HARD metal. It is quite unlikely that "the nib will wear down to your specific writing style and posture." That is unless you are writing on abrasive paper. Today, the vast majority of writers do not write anywhere near as much as people did in the pre-computer days. So the number of hours of pen use has also gone down, further reducing the wear on the tip.
Dekay
13
Aug 1, 2016
If you absolutely must carry your fountain pens on person and you wear dress shirts, put them in the shirt pocket - that way they stay nib-up and are not jostled excessively, so there's less ink splatter in the cap.
pepper_elm
10
Jul 30, 2016
I generally only use bottled inks. However, I stockpile old cartridges, esp. proprietary ones, like crazy. I even empty out the carts that come with new pens if I'm not crazy about the ink just so I can refill the cart with one of my inks. I syringe fill them with my favorite bottled inks for travel or if I'm short a converter. I seal the cartridge with a little dot of hot glue (not too hot to distort the plastic). The hot glue seal peels off cleanly and you can get several uses out of a cartridge before the plastic begins to distort. Two short intl carts will fit inside most intl std bodies for travel.

DLO3
5
Jul 30, 2016
I have done this many times. It is especially helpful when one has different manufacturers with different cartridges. I have many ink colors and use them in all my pens by this method.
Showing 16 of 23
Related Posts
BillA2021
Buy replacement quartz movement
Is an original quartz movement or a suitable substitution available for my Wenger 7900X watch at a reasonable cost, or is this not feasible I’m new at this. Thanks.
Mar 18, 2021

reswright
Basic Flip Smoothing
So you picked up a budget bearing knife as a ‘project’ knife to putter around with and you’re looking for ideas? One thing you can do is polish the bearing works, smoothing both the flip and the close action until you've got some semblance of a noiseless flick open and a smooth, gravity drop shut. This can be done many, many different ways, as many ways as there are to smooth and then polish metal; your humble narrator prefers to use a Dremel, using the following steps. I should probably make some kind of disclaimer statement here - this guide is for people already handy with a Dremel. If you’re not already handy with one it’s best not to learn how to use one while handling pocket knives or other sharp and pointy things. Hand held high RPM rotary grinding tools can be surprisingly violent if they get out of your firm grasp, they can impart an astonishing amount of kinetic energy to small sharp things you're trying to polish, sending them flying further and faster than...
Feb 6, 2021

RayF
RayF's Guide to Thanksgiving Day Watches
Please do enjoy your Thanksgiving (for those of you in countries where that means something), but please, please, please--whatever you do--don't wear either of these tacky watches while you're doing it!
Nov 26, 2020

Trending Posts in More Community Picks

Graham88
Completely surprised by the lack of blade diversity here on Drop...
I’ve been a collector of Blades since before my teens, and a retailer coming up on 15… or maybe 20 years. Drop has really been kind of an interesting experience for me, because I do occasionally get to see some unusual tech and sometimes EDC items that otherwise I might not have been aware of. And maybe it’s because I have a deep love of cutlery and bladed weapons, but I find myself trolling through the site looking at it what’s available; and it’s just it’s pretty much the same. And the bladed community here is just always confused me.. every single knife is about the same, they’re almost all drop points and although the handle materials change and brands change.. it’s really just the same knife over and over and over again... occasionally you’ll see a tanto or a slight variant; but rarely… and almost never a serrated blade. And I’m just deeply amazed at this diversion of serrated blades. And I’m just surprised there isn’t more of a request for diversity here.... and I...
Mar 12, 2020
JellyDPhoto
Can we get Sony E-Mount or other mirrorless camera options please..
Would be nice to see some Sony E mount full frame cameras on here. I currently shoot with a A99 and they killed the lense path for better or more option lenses and now is all E-Mount. 🤔
Jan 13, 2020

RayF
There Are Pandas, and Then There Are Pandas.
And this isn't either of them! The Pandas we're talking about here, are watches, not bears. And what got me thinking about them (again) was a link posted this morning by @cm.rook who pointed a few of us to the very attractive (and not terribly priced) Yema "Rallygraph" Panda which, in it's most traditional arrangement, looks like the one on the left, but can also be had in the version on the right: The model on the left is a true Panda, while the model on the right is called a reverse Panda. The reason for that distinction is clear--Panda bears, only come in the first arrangement. Now at this point, everyone should be thinking about the most well-know Panda, The Rolex Panda, which is actually a Daytona, and among Rolex Daytonas, the most famous of which is the Paul Newman Daytona, which was famous first, because it was Paul's, and second because it sold at auction for $17.8 million (US Dollars). The story of that auction is well-known so I'll only...
Nov 8, 2019
Drop Refurbished
Like-new products you can trustDrop Rewards
Get $5 for every 500 points you earn! Learn more
Drop Keyboard Club
Become a member and expand your keycap collectionCollaborate With Us
For Brands & DesignersFollow Drop
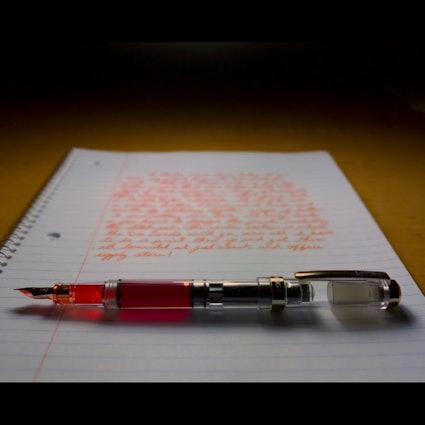
There are a lot of good reasons to use a fountain pen. For one, it adds character to your handwriting—in every dot, cross, and flourish—that you just can’t get from a standard ballpoint. Some people consider it a relatively inexpensive way to bring luxury into their day-to-day lives. Others like that it’s reusable, and more cost-effective than buying a new disposable pen every time the last one runs dry. Then there’s that hard-to-describe feeling: Fountain pens feel good to write with, plain and simple, and they make you want to keep writing.
Once you’ve decided to make the switch, there are a few steps you’ll need to take before you’re ready to jot, scrawl, and scribble with the best of them. The world of fountain pens, like any new hobby, can be a mysterious place with its own history and vernacular. And it can get a little messy, too—especially when you want to clean your pen or start inking it from a bottle. But don’t let that scare you! The process can also be incredibly rewarding, as you try different pens and accessories, discover what you like, and begin to build your own collection.
This post will offer tips on how to get started with your first fountain pen. For a list of basic components and key terms, check out "Massdrop 101: Intro to Fountain Pens" (dro.ps/introtofountainpens).
When testing the waters, first-time users may look for a fountain pen with a combination of comfort, affordability, and convenient, easy-to-use features. Take the Pilot Metropolitan, for instance, which has a well-balanced body in a variety of colors and patterns, and a converter that makes it compatible with bottled inks right out of the box. Or, try the Lamy Safari, whose contoured grip section is designed to help users hold the pen in the traditional position. Other great pens for beginners are the Platinum Preppy, Pilot Kakuno, Lamy Vista, and Lamy AL-Star.
When your fountain pen arrives, check it top to bottom for damage and contact the manufacturer if anything looks off. If an instructional manual and warranty card are included, read them thoroughly and abide by any suggestions from the manufacturer.
The fountain pen consists of four major parts when assembled: the cap, the nib, the barrel, and the ink reservoir. The mechanisms used to fill the ink reservoir vary by pen type. Cartridges are the easiest and quickest to use because they come preloaded, but their biggest drawback is that they’re not designed to fill with bottled ink. Converters make cartridge pens more versatile by allowing them to be filled from the bottle. Pens with built-in fillers—and eyedropper pens, to an even greater extent—provide a higher ink capacity for those who need it. When choosing a pen, think about which benefits are most important to you.
Note that some pens use an international standard cartridge that can be used across brands, while others have a proprietary cartridge that won’t be compatible with pens of any other brand. Make sure you know your pen’s compatibility before you pick up any new cartridges. The same is true for converters.
Use a converter to ink your cartridge pen from a bottle. The most common types are the piston converter and the squeeze converter, which work more or less the same way: by using mechanical force to create a low-pressure chamber into which ink is drawn.
To fill a piston converter, install the converter into your pen the same way you would a cartridge. Dip the pen into the bottle of ink until the entire nib and part of the grip section is submerged. Twist the end knob until the piston is fully extended. Then, twist the knob in the other direction, retracting the piston and drawing ink into the converter. You may need to repeat this step once or twice to fill the converter. When you’re done, wipe the nib off with a paper towel and reassemble the pen.
To fill a squeeze converter, dip the pen into the bottle and gently squeeze. You’ll see bubbles appear as air leaves the converter. Release the converter slowly and wait for the suction to draw ink into the pen. Repeat until the bubbles stop appearing.
Fountain pens with built-in filling mechanisms can be broken into two main categories: piston fillers and vacuum fillers. Built-in piston fillers operate much like piston converters, so follow those steps above.
With a built-in vacuum filler, unscrew the knob at the end of the pen and pull back the plunger. Next, push the plunger back down—this motion creates a vacuum in the ink chamber behind it. When the plunger reaches the flared section at the base of the chamber, the vacuum is broken and ink will flow quickly into the pen.
An eyedropper pen is one that must be filled with an eyedropper, syringe, or pipette. Because no space in the barrel is occupied by a cartridge, converter, or built-in mechanism, these have the largest ink capacity of any pen. To fill an eyedropper pen, unscrew the barrel and coat the threads with silicone grease to ensure a watertight seal. Fill the barrel up to the threads with your choice of ink, and then reassemble the pen.
When you’re starting out with a new pen, quickly run the nib under running water to help get the ink flowing. Don’t worry if it doesn’t start flowing automatically—there a number of troubleshooting techniques you can try.
Some users leave the pen resting nib down for an even longer period of time, some gently squeeze the cartridge, and some dip the nib in water. Others still will tap the point on a piece of paper until a drop of ink comes out, then stick the point in the droplet and draw it in. Of course, the best way to keep a fountain pen going is to keep writing. Plus, as you use your pen more and more often, the nib will wear down to your specific writing style and posture.
Still not working? Brand-new pens sometimes have an oily film on the feed or nib, and unless they are given a thorough cleaning, the ink may not flow smoothly.
The following steps can be used to clean your pen on day one if you’re having trouble getting it to write, and also for regular cleanings throughout the life of your pen. Maintenance should occur every 2 to 4 weeks (depending on the pen) if you’re using the same color, and every time you change colors. Manufacturers recommend distilled water, but room-temperature or lukewarm tap water can work just as well.
Sink Method: Disassemble your pen near your sink or cleaning station and empty the ink. If the pen is full, you can try emptying the ink back into the original bottle or another small vial to save it for future use. If you’re not worried about that, you can simply empty it into the sink. Next, hold the nib section under running water until the water runs mostly clear. This is the fastest way to flush your pen, and for pens that are properly maintained and haven’t accumulated buildup or debris, this step may be enough.
Optional Soak: If your pen has been sitting for a while (or you want to be extra thorough), you can also leave any parts that have been inky to soak in a cup of water. This helps clear out any dried ink. After you remove the pen parts from the water, dry them as much as possible. If you have time, let them dry on a paper towel overnight. If you’re in a hurry, go ahead and reassemble your pen and fill it with new ink. If you fill it immediately, however, you may need to use scratch paper for a bit until the ink flow becomes appropriately saturated.
Alternative Method: For a deeper clean, fill two plastic cups with water and use a converter (or the pen’s built-in filling mechanism) to pump in and out. Use one cup first, and then the other. Because the water you flush through your pen will dirty the water in the first cup, it’s helpful to switch to the second cup part of the way through the process, so you’re not continuously moving dirty water through your pen. If you’re cleaning an eyedropper pen, you can use the same setup but with a rubber bulb syringe.
Getting Accustomed
Now it’s time for the fun part. Spend time with your fountain pen so you can get used to a different kind of writing. You’ll want to use less pressure than you would with a ballpoint or rollerball—a properly tuned fountain pen should write under its own weight, and adding to much pressure could damage the tines or nib, or cause your hand to cramp up.
You may also find that you’ll need to write bigger than you did with other writing instruments, holding your wrists and fingers stationary and using your arm and shoulder to shape the letters. If you’re left-handed, you may have to adapt your writing style even further. Because fountain pen ink takes longer to dry, you’ll have to work harder to avoid smudging as your hand moves across the paper.
While you’re writing, pay attention to what work’s working and what isn’t. Do you like the weight of your pen, or do you wish it were heavier or lighter? Thinner, thicker, or shaped differently? Post the cap or don’t—it all depends on whether you like the extra length. Is the clip important for holding your pen while in transit, or do you prefer to carry it in a case or sleeve? Do you like the design and materials? Write, observe, then write again.
While you’re at it, try different inks. Notice the thickness of the line on the page, and appreciate the ink’s texture, sheen, and depth of color. Take careful note of how the color gradually changes as the seconds pass, and you might actually get excited about watching ink dry. (That’s when you know you’re hooked.) If you don’t know where to start, an ink from the same brand as your fountain pen is a safe bet.
A few parting thoughts: Never use rubbing alcohol or acetone to clean your pen, as both contain chemicals that can damage (and even melt) the plastic parts within. Be careful to use only water-based ink in fountain pens, and stay away from shellac-based calligraphy ink (like India ink or Lawyer’s ink). Calligraphy ink is designed for use with dip pens only, and can cause serious clogging. Between writing sessions, keep the cap on your pen to prevent the ink from drying out. Be careful not to carry your pen in the same pocket as your keys, as the metal of the keys can damage the pen body.
There you have it: a guide to getting started with your new fountain pen. But that’s only the beginning. Look out for posts and tutorials that dig deeper into these topics, and be sure to hit the "Follow" button to be notified about future posts from this account. In the meantime, if you have questions or comments about this post, or about fountain pens in general, leave ‘em below. Have personal recommendations or stories to stare? We’d love to hear them—and see pictures, too!