Click to view our Accessibility Statement or contact us with accessibility-related questions


Showing 1 of 1320 conversations about:
Drop + THX Panda Wireless Headphone
Pennultimate
49
Keyboard Club Member
Dec 9, 2021
Hey guys, I’ll post a rude disassembly guide soon. I took a physically broken pair and donated the battery first (no fix) then the entire board into a bricked pair. Worked, but it was a pain in the ass. Donor pair is practically destroyed.
fiyadh.mowla
1
Apr 2, 2022
PennultimateHi there, any luck with giving quick process. Mines bricked and I want to change the battery. Thanks
Pennultimate
49
Keyboard Club Member
Apr 3, 2022
fiyadh.mowlaSorry, I didn’t end up making a good guide, but I can explain with some pictures to help.
Before I start I’ll tell you that changing the battery prolly won’t fix it. It worked on mine until it needed to charge again.
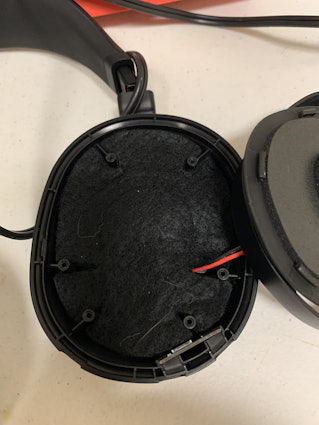
1 Remove the ear pads.
2 The foam between the driver and the pad is covering 6 screws. You don’t need to remove it entirely if you look closely at the picture below and peel it up at the correct spots. The trick is to get something sharp that can get under the edge of the foam. Electronics tweezers work wonderfuly. You should feel resistance when you are prying under it. If not then you are just stabbing the foam.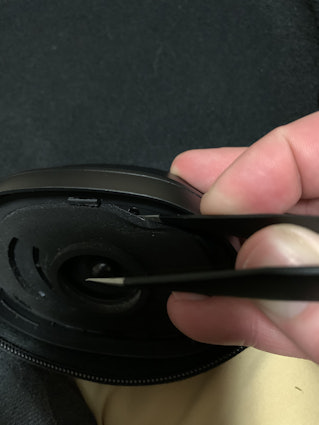
(Edited)
Sampson
24
Aug 26, 2023
PennultimateThank you so much for this guide. I have a question that I think you might be qualified to answer if you have the time. My headphones have been working great for years, then suddenly last week my left side quit playing audio via bluetooth but it still works perfectly via the 3.5mm audio jack. Any advice on where I should look in the internals? If I open them up should I start with the left side, or is there a solder joint on the right side that's known for having issues? Thanks again.
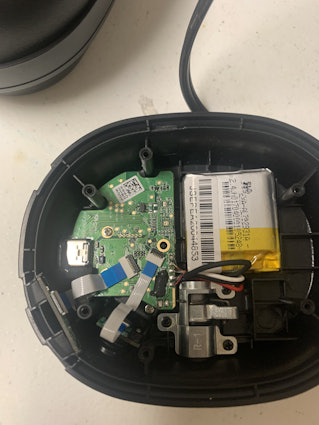
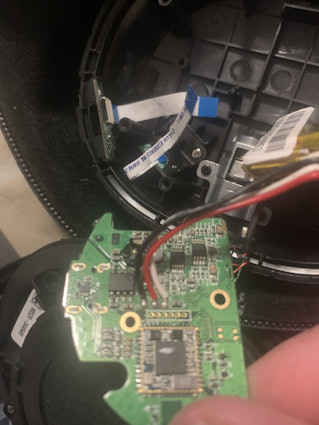
Oh, also, another related question - I have a second pair which are bricked. If I can't repair the first pair, would I be able to fix the bricked pair by swapping this board in the photos?
(Edited)
PRODUCTS YOU MAY LIKE
Trending Posts in Audiophile


redspet
So I bought the HD6xx
So I bought the HD6xx a few weeks back and when I finally got the packages i got some Noir 99. ever happened to any of u guys and how did it get resolved
Apr 29, 2024
SsButerbal
Ringing in PC38X's
I recently got this headset, and wow is it good. My only issue is when certain people talk on discord, I can hear a really high pitched ringing. I fiddled with a bunch of settings, computer audio and discord, and nothing seems to solve the issue. It is primarily if not all in my right ear only. Is there something wrong with my headset, or was that ringing always there I can just hear it cause the headset is THAT good? I haven't had any issues with any other application, though I have yet to test if I can hear the ringing on a different version of discord, say on my xbox instead of my pc. Only other issue I've had is occasional static, but I can't tell if it's from the headset or the show/game/etc.
Apr 24, 2024
itsamepe
Sennheiser PC37X randomly goes bad after disconnecting the cable ?
Greetings, Yesterday I was using my headset like normal with my macbook, just listening to music and on a call with people like usual, and the headset was perfectly fine. The stock wire that came with the headset is extremely long and yesterday it annoyed me very much that it kept getting tangled with itself, so I decided to see if the cable is replaceable. I pulled out the cable from the headset and saw the adapter, and looked online for a replacement. Upon plugging it back in, the audio sounded extremely muffled and washed out. Im not sure what I did wrong to make it mess up like that as I've always taken good care of it, ive had it for about 2 years and its always just been chilling on my desk, but anywho I thought the cable just went bad and ordered a replacement. The replacement came, and the issue is still persistant, so I am not sure what the issue is I've tried multiple different headsets and the issue is not with the port, and I also tried it with my windows laptop and...
Apr 23, 2024
MrChiSox
Big changes coming to my tiny little music room, I've recently purchased a new stack. Currently figuring out where to locate it all and ordering up the necessary cables, it won't be too long before I'm up and running. I am now the proud owner of a brand new stack. It's a European brand called Earmen. Amp, DAC, Streamer & Linear Power Supply. It won't be long!
https://www.youtube.com/watch?v=MB15yM4UptQ
Apr 23, 2024
Briankan
Recommendation for my next headphone set? I have Koss 95x
Hey all, What would you recommend I get next and why? I have Koss ESP-95x electrostatic massdrop headphones. These are my first and only audiophile set. I love them. I think my only real requirements is $500 or less for the headphones and that they have a little more low end. I don’t need thump but these are really light on lows…but the experience is still awesome. Also any recommendations on an amp? I only have my electrostatic thingy. I am using the Topping D50 DAC. thx!!
Apr 22, 2024

Simthaniel
Rigs
Modded headphones with qudelix at the core
When I received the Qudelix 5K, I had already modified a pair of Superlux HD-681 headphones. I previously soldered my own balanced connections to the drivers, providing multiple ways to connect and...
Apr 14, 2024
Drop Refurbished
Like-new products you can trustDrop Rewards
Get $5 for every 500 points you earn! Learn more
Drop Keyboard Club
Become a member and expand your keycap collectionCollaborate With Us
For Brands & DesignersFollow Drop