Click to view our Accessibility Statement or contact us with accessibility-related questions
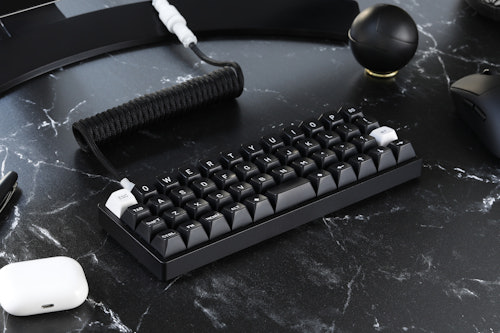
Drop + OLKB Planck Mechanical Keyboard Kit V7
$99
$129

Drop + OLKB Planck Mechanical Keyboard Kit V7

bookmark_border
$99
$129
Variation:
·
Free Returns in USA
Members who purchase earn
297
Drop Rewards
Frequently bought together:
add
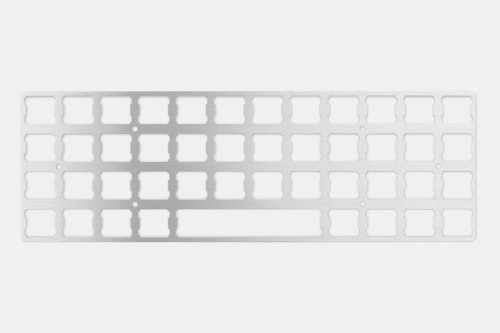
Drop + OLKB Planck Switch Plate
add
Ortholinear Keycaps
add
Carrying Case Add-On
Review Highlights:
expand_less
Solid, Powerful Compact Keyboard
I've had my Planck v6 for two months now and overall, it is a joy to type on. Pros: +The QMK firmware offers a level of customization beyond what any sane person could want. c-coded macros with states and timers can be triggered by assigning custom internal keycodes to keys or by entering a sequence of keys with leader-key functionality. Up to 32 stackable (and conditional) layers can be programmed, so that multiple layers triggered at once causes expected behavior, and switching base layers allows for a variety of "modes". +The keyboard is lightweight, compact, and portable, but it is also solidly built. It can easily fit on top a laptop without hitting keys or triggering the touch pad. (You will want to use an L-shaped cable if you use the keyboard with a laptop.) +The keyboard is easily powered by and functions with all of the android devices I have tested, (both those with USB-micro and USB-C ports), which I cannot say of other, more power-hungry keyboards I have owned. (Both C-to-C and A-to-C with a micro (or C) adapter on the A work, as long as the adapter-side isn't the one plugging into the keyboard.) +The hot-swappable switches on the keyboard really are hot-swappable. (I did not like having some of the keys clicky that I thought I would like clicky, and was able to remove and replace the switches without any problem.) Cons (most are minor firmware related gripes): +There is a steep learning curve, both for learning how to customize it properly (by cross-compiling c-code), and for learning how to type on it in a way that is effective and does not cause strain to your hands. Prepare to modify your keymap several times before you find what works best for you. You may have to change compiler flags just to get the firmware to compile. ('make CFLAGS+="-Wno-error -Os" planck/rev6:keymap-name:dfu-util' works for me.) + There is no easy way to switch between mouse settings on the keyboard (because they are hard-coded), and the speed of the mouse can vary from operating system to operating system. You may have to select values that are a compromise. There is a mouse mode that allows selectable speeds, but enabling this disables the more intuitive acceleration mode. (Update: a new mouse mode in QMK fixes this!) + The keyboard does not seem able to trigger a wake from sleep (with at least one of my laptops), and can sometimes take a while to respond after a wake from sleep. (This may not be the fault of the keyboard (it might have something to do with USB-C and windows), but my other keyboards do not have this problem.) (Update: It was a problem with the USB port on that computer, not the keyboard.) + The Alt+Tab macro (w/timers) feels a little bit like a compromise compared to other less-customizable keyboards with a better behaving app-switching keys. (Update: If you get creative with the coding and make the alt-hold dependent on which layers are active, it works much more smoothly.) + There seems to be no way to end a leader-key sequence without having to wait for it to time out. I would like to be able to choose whether hitting the leader-key again pre-timeout confirms/ends, cancels, or restarts a sequence. (Currently it does nothing.) Recommendations: +Use the 48 key layout. The extra keys at the thumbs are useful for extra layer switching. (Flipping the keycaps so that they angle downward will reduce thumb fatigue and help you feel the center.) +The default keymap isn't spectacular, but it does include a lot of functions w/intelligent comments and can be used as a reference for making your own. +Buy a couple of L-shaped USB-C cables. Because USB-C is flippable, you can insert them so that the cable runs either left or right along the keyboard. This puts less stress on the USB-C port (which has been identified as a structural weak point) and lowers the space footprint of the keyboard considerably. +Using taller SA-profile (or similar) keys for the top left and right corners may help your fingers navigate.
check
Would recommend to a friend.
See all 779 reviews
Q&A Highlights:
expand_less
are stabilizers included?
Yep! The kit comes with two 2-u stabilizers.
Can I put rotary encoder on this?
Yes! The left side of the board has positions for a Rotary Encoder. You can solder one in in either of the four positions. (Or all, but you can only have one programmed function active at a time, not make each RE do something different.)
See all 291 questions
Want to know something about this product or how to use it?
Ask the community!

search
close
Schm1tty
25
Aug 15, 2020
Is anyone able to confirm where these are made? I contacted Drop support to ask where these are manufactured and the reply was: "Hello There, This is xxxxx with Drop Community Support. Thank you for contacting us!  Unfortunately we do not have that kind of technical knowledge of where the DROP + OLKB PLANCK MECHANICAL KEYBOARD KIT V6 is manufactured. I do apologize for that. If you have any other questions or concerns please reach out to us. Best Wishes, xxxxx"
speakeasy_my
3
Apr 26, 2020
Can I put rotary encoder on this?
MinaDarsh
334
May 22, 2020
Yes! The left side of the board has positions for a Rotary Encoder. You can solder one in in either of the four positions. (Or all, but you can only have one programmed function active at a time, not make each RE do something different.)
VIEW 5 MORE
shangsfanclub
6
May 22, 2020
Is it possible to split the Space bar into 2 separate keys on the PCB?
enferex
55
May 22, 2020
Yes, this comes with two 2u stabilizers and two 2u spaces bars. You can also use four 1u keys as well; however, I haven't completed my assembly, and I'm not sure if there are extra keycaps in the case you chose to replace the space bars with 1u keys.
(Edited)
VIEW 7 MORE
thuslako
7
Jun 2, 2020
are stabilizers included?
enferex
55
Jun 4, 2020
Yep! The kit comes with two 2-u stabilizers.
VIEW 2 MORE
thatdudedaniel
1
Sep 12, 2020
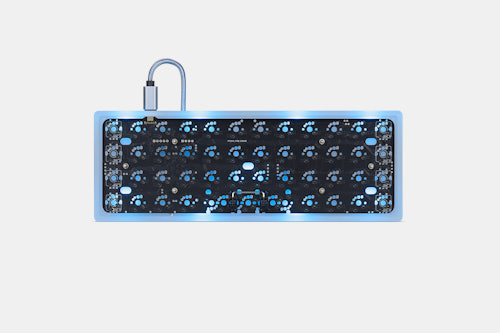
so, my build came with the led/rgb lights on the pcb. I don't see a way to turn them off. Is this a keyboard combo or built into the firmware to turn them off at will?
Kempain
9
Nov 20, 2020
Yup definitely a nice surprise to have LEDs included on the board. I basically did the same as @Dog_OK. Mapped the RGB options to various keys so I could switch to the colour I wanted then flashed back to the defaul keymap. BL_SHIFT which is mapped to the bottom left key by default doesn't seem to do anything, which is probably because BL is disabled or there aren't any cycle settings in the default firmware. You could leave that key as RGB_Toggle to have a permanent button to turn on/off RGB easily. For newbies like me below is the exact process I followed (on Windows):
  • Navigate to: https://config.qmk.fm/#/planck/rev6/LAYOUT_ortho_4x12
  • Select the Keyboard Settings tab under Keycodes
  • Drag RGB_Toggle to the bottom left key (BL CYCLE)
  • Optional: If you want to change the colour map Hue, Sat, Bright to other keys (I used the arrow keys)
  • Click Compile at the top right and wait for the potatoe to bake! :)
  • Click the Firmware button which will become available after compilation (downloads the *.bin)
  • Download QMK Toolbox: https://github.com/qmk/qmk_toolbox/releases (I used the portable .exe version)
  • Open QMK Toolbox (install drivers if prompted)
  • Make sure your Planck is plugged in and press the reset button on the bottom
  • You should see STM32 Bootloader connected in the console (don't worry about it stating the driver isn't installed)
  • Select Open and browse to the .bin file you compiled
  • Click Flash
  • Wait for it to finish (do not unplug your keyboard or you might brick it)
  • Use the keys to change RGB settings
  • Optional: Follow the same process to change back to the default keymap (RGB settings will remain as saved in EEPROM I believe)
VIEW 6 MORE