Click to view our Accessibility Statement or contact us with accessibility-related questions$75$7586% would recommend to a friend 


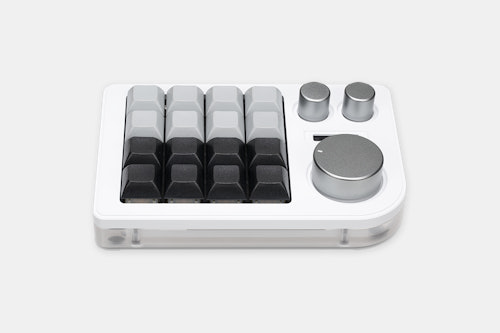
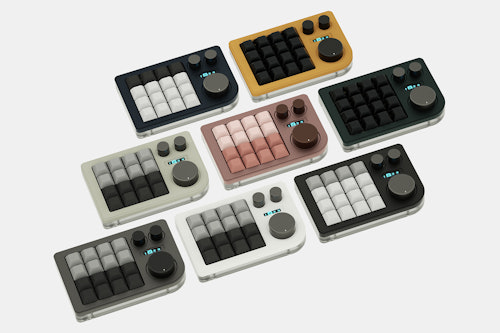
Megalodon Triple Knob Macropad
$69
Megalodon Triple Knob Macropad
bookmark_border
$69
Ready to Ship
●
Members who purchase earn
69
Drop Rewards
Product Highlights:
Frequently bought together:
Customer Reviews
4.2
(105 reviews)
5star(56)
4star(28)
3star(12)
2star(4)
1star(5)
By Feature
Sound
SilentLoud
Feel
StiffFlexible
Build Quality
4.6
(47)
ActivitiesPopular among reviewers
Paired SwitchPopular among reviewers
search
close
Images
keyboard_arrow_downSort by: Newest
keyboard_arrow_down
Nothungry
0
Keyboard Club Member
Dec 19, 2024
Activities:Work & Gaming
Paired Switch:Linear
Keyboards Owned:10
checkVerified Buyer
No per key RGB & software support is meh
The build quality is better than I expected, but there’s no angle 📐 on the pad. I’ve put some rubber washers on the back to help angle towards me.
software support is not great, it does work with via & vial (after firmware flash) but many things seemingly cannot be bound to the rotary encoders and the whole process is a bit unintuitive.
all that being said, there probably isn’t another macro pad available for this price & quality and it does serve well as a volume dial/mute button which was the primary reason I bought this.
Recommends this product? Yes

ZEHR0
7
Nov 21, 2024
Activities:Work
Paired Switch:Tactile
Keyboards Owned:3
checkVerified Buyer
looks good
pretty expensive imo haven’t used it in a while but worked alright when i did
Recommends this product? Yes
JoeKeyboard
3
Nov 12, 2024
Activities:Work & Gaming
Paired Switch:Linear
Keyboards Owned:3
checkVerified Buyer
Awsome macropad
this help me a lot for a shorcuts, is easy to go betwen layers
Recommends this product? Yes

CheesyCharlie
5
Keyboard Club Member
Oct 23, 2024
Activities:Work
Paired Switch:Linear
Keyboards Owned:5
checkVerified Buyer
Incredibly useful
This macropad has enabled me to put a lot of PC shortcuts within arms reach. The compatibility with VIA makes this an incredibly flexible device, even more so with the many layers that are available on easy to switch to. The build quality is good and the metal top and plastic bottom housing compliment each other well.
Recommends this product? Yes
philatypus
12
Keyboard Club Member
Oct 18, 2024
checkVerified Buyer
Fantastic product, but only after some work.
Fantastic macropad, but it requires setup to work like a macropad should work. Specifically, out of the box it has outdated firmware that takes up a huge amount of space, leaving you with 787 BYTES of storage for your macros. With the macros I typically use, that's around four. Unacceptably small. There is a solution, increasing your storage to 2437 bytes, which is much more acceptable. Unfortunately, directions for upgrading firmware and using it seem to be scattered around the internet, so I'm attempting to summarize them below.
Step 1: flash with most updated firmware. Follow the directions here but flash with the firmware from Github (direct download link).
Note: there are two versions of this macropad, so you may need to flash with a different firmware. Check the Github here.
Step 2: once you've updated the firmware, it is VIAL compatible, so you can use this web interface: Vial Web or download the Vial app.

Step 3: play around with your macropad! After updating, it has 12 layers, but only 4 are enabled. To enable others, you will have to assign a button. Note that as a default, clicking the upper right knob moves to the next layer using code "0x5001" in layer 0, "0x5002" in layer 1, "0x5003" in layer 2, and "0x5000" in layer 3, which returns to layer 0. Following this pattern, I changed the last digit to "4" in layer 3, "5" in layer 4, etc. Layer 10 is "a" and layer 11 is "b" as the board is hex based. (I also assigned the upper left knob such that it goes to the previous layer.) To input these codes, double click on the knobs, or whatever button you want to use, in VIAL.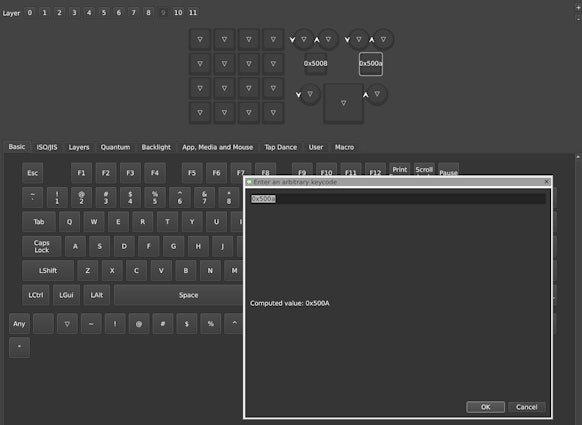
Note: reference to possible keycodes is available here. Future project: I'm hoping to figure out how to edit the number of macros available. Default is 16, but reading the documentation available, it appears that you can increase this number, limited only by available storage. With the updated 2437 bytes, I think I could fit 48 macros in, but I have yet to figure out how to do so. Anyone want to help? Other than not being ready out of the box, my only critique is the build quality seems a little lacking. My screen was slightly off-kilter, and the lack of under-board supports makes me question durability.

Step 3: play around with your macropad! After updating, it has 12 layers, but only 4 are enabled. To enable others, you will have to assign a button. Note that as a default, clicking the upper right knob moves to the next layer using code "0x5001" in layer 0, "0x5002" in layer 1, "0x5003" in layer 2, and "0x5000" in layer 3, which returns to layer 0. Following this pattern, I changed the last digit to "4" in layer 3, "5" in layer 4, etc. Layer 10 is "a" and layer 11 is "b" as the board is hex based. (I also assigned the upper left knob such that it goes to the previous layer.) To input these codes, double click on the knobs, or whatever button you want to use, in VIAL.

Note: reference to possible keycodes is available here. Future project: I'm hoping to figure out how to edit the number of macros available. Default is 16, but reading the documentation available, it appears that you can increase this number, limited only by available storage. With the updated 2437 bytes, I think I could fit 48 macros in, but I have yet to figure out how to do so. Anyone want to help? Other than not being ready out of the box, my only critique is the build quality seems a little lacking. My screen was slightly off-kilter, and the lack of under-board supports makes me question durability.
(Edited)
Recommends this product? Yes
pescadofisk
0
Sep 14, 2024
Paired Switch:Tactile
Keyboards Owned:321
checkVerified Buyer
Don't buy this megalodon POS
This thing comes in a box with a post card that tells you to go to www.usevia.app.
Either provide some documentation or point to a website that has documentation. Selling this thing is basically throwing it in someones lap and telling them "Good luck".
If you think you are going to hook this up to your system and start writing macros you are in for a bad surprise.
Take your $70 and go buy some shoes. This thing is a major disappointment.
Recommends this product? No
satiku
35
Aug 2, 2024
Activities:Work
Paired Switch:Linear
checkVerified Buyer
A solid buy
it is a nice macro pad to have in you setup . the rotary encodes are nice too
Recommends this product? Yes

pkcd
0
Keyboard Club Member
Jul 16, 2024
Activities:Gaming
checkVerified Buyer
Great little macropad.
Build quality is great, and very customizable with software once you figure it out.
Recommends this product? Yes

JWalker16
1
Keyboard Club Member
Jul 4, 2024
checkVerified Buyer
Very convenient
Love how customizable this is.
Recommends this product? Yes

purple_rw
61
Jun 24, 2024
Activities:Work
Paired Switch:Tactile
Keyboards Owned:10
checkVerified Buyer
Great little macropad
High quality product. Nothing to complain. QMK code can be found under https://github.com/qmk/qmk_firmware/tree/master/keyboards/doio/kb16. Mine is revision 2. 

Recommends this product? Yes
Showing 10 of 177
Recent Activity
