Click to view our Accessibility Statement or contact us with accessibility-related questions


How to: Fostex TH-X00 Detachable Cable
search
close
Sort by: Newest
keyboard_arrow_downSuperFlyEDSguy
63
Sep 10, 2021
From someone with an electronics background, I commend you for the excellent tutorial! This is very, very good stuff, and I would love to see more of it on Drop for the community to ‘digest.’ I’m working on an informational article right now on proper volume leveling when adding a preamp to the headphone signal chain. Of course it’s going to be chock-full of nerdy good stuff that we all could geek-out on, but more importantly it’s going to be useful too! I guess that’s why I applaud this tutorial so much, it’s not only useful, but to the point and very well presented! Phenomenal job!
Medieval_Wolf
0
Dec 4, 2019
I did this mod and it kinda works. My problem is my dog chew through the original cable, so I purchased this cable https://www.amazon.com/NEW-NEOMUSICIA-Replacement-Compatible-Headphones/dp/B07H6SPVX5/ref=sr_1_3?keywords=3.5mm+headphone+cable+dual&qid=1575489085&sr=8-3
However, it will not work. If I use a 3 pole 3.5mm and connect to my phone and to one ear cup it works. Or if I pull the aftermarket cable and hold them loose I can get sound that way out of both cups.
Is there another cable I can use? Or do I need to get an adapter? Kinda wish I went with a different female plug now. :(
greens5091
3
Jun 17, 2020
Medieval_Wolflol im having the exact same problem
edit: to fix it you need to re-solder the non working driver baffle to the female connector. the ground is correct but the other wire isn't
(Edited)
taylptrsn
0
Mar 11, 2019
For the dremel sanding band, did you just use a quarter inch diameter or something else?
Thanks!
MXRC
261
Apr 15, 2019
Hey sorry, I haven't been on Massdrop for almost a year haha. Just saw this. And, nah. I don't do it as a service. To be honest, this was my first time attempting a mod on headphones ever. Haha.
SuperFlyEDSguy
63
Sep 10, 2021
I’m liking this because the comment doesn’t suck, but even more importantly — I freaking love the Thundercats logo as I grew up with them — And, if that’s not worth a +1, well, I really dunno what is?! 😂
Now, onto something a bit more sensible and on the subject:
I actually would recommend getting a few cheap pairs of headphones to ‘practice’ on, along with some solid 3.5mm jacks and other hardware that you could ‘re-use’ when practicing. The headphones you would buy to learn on should literally be “throw away” quality, the hardware materials should be of decent quality, so you could re-use them without spending a small bundle of cash. Like most things, this type of job comes down to two things: (1) practice and (2) muscle memory. The application is very similar regardless of which kind of headphones you attempt to work on, but after doing this a few times, you will absolutely get comfortable enough to try your luck on better cans. For your first pair of ‘real world’ headphones, I’d recommend using something like a Koss KPH30i as the factory cable is s*** aside from being ridiculously short. The headphones are otherwise a very solid pair! I think you would find great pleasure upgrading one that you could use, and for $30 or so, if you screw up, it’s not like you butchered a Sennheiser HD 58X or 6XX! I am actually planning on doing a KPH30i myself in the hopefully near future. I love the sound, but despise the cable! I just need to find some time to do the project.
Best of luck, and be well! ✌️

ridhuankim
671
Jun 3, 2018
ridhuankim
671
Sep 24, 2020
Nope. And it shouldnt unless you are using bad cables.
Or maybe you are using an impedance adapter?
Related Posts

Evshrug
Audiophile 101: Essential Gear Overview
Image credit @zhugunic https://drop.com/talk/67372/gl-2-k Do I need an amp? What are these acronyms like DAC, DSP, or DSD? What even are all the components that make up an audio chain? Let’s take a beginner’s look at the core, essential building blocks of a digital audio chain, and lay it plain what each piece does. We can cover the major pieces separately, but I’ll still include a few tips to optimize playback here. Please hit the little bookmark button and feel free to check and share this guide whenever you need a reference! For people who need a visual and audible explanation, or are worried it would take too long to get a working knowledge of the audio chain, here is my YouTube video on this subject that is just 7 minutes long! I like writing though, so let’s get started with an overview, then break it down into what each piece does and how an upgrade would benefit the final sound quality. Signal Path Image credit @SpeleoFool https://drop...
Mar 22, 2023
eyestech83
5 Ways to Fix Jio Cinema Not Working – Expert Tips for Seamless Streaming
If you’ve been trying to watch your favorite movies and shows on Jio Cinema, but things aren’t working as expected, jio cinema not working you're not alone. Streaming issues are common across platforms, but the good news is that many problems with Jio Cinema can be resolved with a few simple fixes. In this expert guide, we’ll walk you through five effective solutions to help restore your Jio Cinema streaming experience. 1. Check Your Internet Connection A stable internet connection is essential for uninterrupted streaming on Jio Cinema. Slow speeds, intermittent connectivity, or poor network strength can cause buffering, freezing, or even prevent the app from loading. What to do: Test your connection speed: Open a browser and run a speed test to ensure you're getting the bandwidth required for HD streaming (usually at least 5 Mbps). Switch between Wi-Fi and mobile data: If your Wi-Fi connection is unstable, try switching to mobile data. Alternatively, switching to a stronger Wi-Fi...
Nov 22, 2024

HoffmanMyster
New Feature—Product Tagging in Photos (+ Giveaway! - Audio Rigs Edition)
Ahoy, audiophiles! Hot on the heels of the launch event for the mech keys community, we are kicking off the Audiophile Rigs product tagging launch event (with a bonus giveaway for those who participate!). Check out all the Rigs submissions thus far! Audiophile Rigs What’s this about a giveaway? More details can be found at the end! The short version: we will be giving away $100 Drop Rewards credit to one lucky winner (randomly selected) from all participating users who contribute and tag their Audiophile photos using the "Rigs" flair! In order to be eligible for giveaway prizes, your photo must include at least two tagged items (not required to be Drop products—see Tagging Non-Drop Products below). Post must be made in the first two weeks (by 2023-05-10 11:59PM PT) in order to be entered. What is Product Tagging in Photos? Product tagging allows you to tag any products in a Photo post—both those found on Drop currently, as well as write-ins that will be manually approved and...
Apr 26, 2023
dekoni
Introducing Dekoni University
Dekoni Audio is excited to introduce our new Dekoni University video education series. Check back frequently to see our latest videos.
Aug 10, 2021
krist0f
DAC/AMP choice - please help
OK... I am going thru forums, reading and watching reviews for DAC/AMP combo for my pc and... seriously i do not know which one to choose. Here is my 'wish list'... maybe you can help... Main goal is to... like everybody i guess: listen to music / watch movies / gaming. Gaming is priority. I am not audiophile (sorry). But I do appreciate good sound quality. Wish List: will not 'break the bank' - preferable under $200... I would prefer it to have mic input but it is not a 'must' requirement. I would prefer it to be 'external' device. Not a must though. Need controls on the desk though. I would prefer it to work 'driverless'. So... hardware-based. I would like it to have some kind of hardware equalizer. I would like to be able to connect (computer) speakers and headphones the same time it does not need to be 5.1/7.1 etc. I prefer good stereo over these systems. Does anything like this exist? Closest to all checkmarks is Sennheiser GSX1000... i guess... not the newest technology...
Jan 5, 2021

Evshrug
Thoughts: The BEST Gaming Headphone for All Time?
Pairing up a gamer with the right headphone is a bit like playing matchmaker! In this video, linked at the end, I boil down over 10 years of community advice into 3 Personality types: • Competitive • Entertainment • Immersion I share a few keywords to look for, as well as some software and settings suggestions. I think everyone has a little bit of each type in them, but which type is dominant for you? Thanks to the sponsor of this video: DekoniAudio.com Dekoni is a headphone accessories company, unique for providing frequency response graphs on their website so you know what effect their various pad options will have. Thanks also to Drop for giving me permission to share here. I hope it helps everyone! The video: https://youtu.be/42SRsSlIj-c
Sep 29, 2020
Trending Posts in Audiophile
magica
What lead/cable do i need?
i own a Drop + EPOS PC38X Gaming Headset and i need a new cable that connects the headset to the computer. i dont know what its called and i cant work out what to look for on amazon etc. could someone please help me with this
Dec 21, 2024

MrChiSox
New addition to the stable.
I made the decision to take advantage of the $600. price on the HiFiMan Arya Stealth, here pictured with the Meze 109 Pro. I think 2025 is going to be a really uneventful year so far as new purchases. I've also upgraded my Fiio BTR7 to the newly released BTR17 and I purchased the Earmen stack which consists of Amplifier, Linear PS, DAC & Streamer.
Dec 19, 2024
RNT47
Until when will the Sennheiser 58X and 6XX will be at discount price?
I'm planning on buying either one on the 18th and i'm worried i'll miss the discounted prices
Dec 16, 2024

MusicLvr
Drop x Campfire Audio Darkstar Review
The Darkstar definitely has a a unique sound that has an audiophile sub-bass bias. It is a balanced sound with open sounding mids and well extended treble. There is no mid-bass bloat thanks to...
Dec 4, 2024
bill.davies
BMR2 discounts for BMR1 owners
How about providing a BMR2 discount for BMR1 owners? Most of the "improvements" in the next gen should really have been there in the first which was a pretty big disappointment for most of us. UPDATE: 40% discount offered. That's great, I'm in. Thank you DROP.
Dec 3, 2024
drPOGI
DROP BMR1 Broken?
Can anyone help me with this? Went away for dinner and came back home to my speakers making this static sound(Video Link). Its like this both in Line In and Bluetooth mode. These speakers were super super hot but I was told that it was normal for it to be this way. Sucks that literally I am just about two months out of the 1 year warranty :/ If anyone can help me that'd be great.
Dec 3, 2024

Drop Refurbished
Like-new products you can trustDrop Rewards
Get $5 for every 500 points you earn! Learn more
Drop Keyboard Club
Become a member and expand your keycap collectionFollow Drop
Here's the completed assembly of what we'll be doing:
PREFACE: It goes without saying that doing this will void any form of warranty on your headphones. Also, you could permanently damage components of the headphones. Continue at your own risk. There are a few things I would like to cover before we go ahead with the step-by-step.
- Connectors: There are many types of connectors available for this mod. I decided to go with 3.5mm jacks and plugs since these are the most readily available and easy to find parts. Pre-made cables with 3.5mm connectors are also easy to source if I decide to use third-party products.
- Wiring: As with the choice of connectors, there are a few ways to wire the drivers up to the jack. I went with hot>tip & ground>sleeve for both Left and Right connection points. This is the same wiring that HiFiMAN does on their 400 series headphones.
- This guide is written assuming that you've got the fundamental basic knowledge and skill of soldering and wiring. I have not provided detailed images of the actual soldering and wiring process.
DIFFICULTY:On a scale of 1 (derp) - 5 (expert maker and electronics engineer), this project is 2.5/5. There are YouTube tutorials for soldering and wiring audio connectors. It's straight forward. Take it easy, take notes, take pictures, measure twice, and cut slow. I'm a noob at modding headphones and managed not to mess it up. You've got this!
Put on some music or a movie in the background. The whole project will take a couple of hours. Wear appropriate protective gear like a face mask and workshop safety glasses through the course of the project. Let's go!
TOOLS & MATERIALS: I bought everything on this list from Amazon. If you've already got the tools, the materials will cost around $25. If not, add another $80 or so for the tools. In order to do this mod, you will need the following (I've included Amazon search terms and prices to the list of items):
- Soldering Kit: Iron / Solder / Tip Cleaner. The hotter the soldering iron, the quicker you can solder joints. Pick one that's capable of at least 400° C. This will ensure that you can make solder joints quickly without overheating the wires and the magnetic drivers of the headphones. | GLE2016 Electric Solder Kit $10.99
- Wire Cutter / Wire Stripper | CHPOWER Wire Stripper $9.99
- Dremel Rotary Tool | Dremel 7700 Kit $39.54
- X-acto Knife | X-ACTO #1 $5.97
- Screw Driver | ORIA JIS Screwdriver Set $15.99
- TOTAL: $82.48
MaterialsSTEP 1 - DISASSEMBLY: Start to disassemble the components of the headphone. The ear pads are bayonet mounted and can be removed by twisting. Once the ear pads are removed, the driver assembly can be accessed.
- Unscrew the complete driver assembly from the magnesium frame.
- Next unscrew the driver & baffle assembly from the wooden cup housing to access cable wires behind the driver.
- Cut the internal wire right where it meets the baffle. This will ensure the correct wire length for the modification.
- Remove the wire and rubber cable tension guard from the frame. SAVE the tension guard. We will use this later for the 3.5mm plugs.
- Repeat these steps for both Left and Right cups.
You should end up with a completely disassembled pair of TH-X00:STEP 2 - CAVITY CREATION & CUP ASSEMBLY: NOTE: This is easier done with the baffle and cup assembled.
- Remove the foam surround from the driver assembly.
- Apply tape over the driver grill to prevent dust and shavings from entering.
- (Optional) Place a vertical tape that's 8mm wide as a guide where the cavity will be made. This will prevent from removing too much material and making the cavity too wide.
- Carefully use the sanding band and Dremel to create the cavity for the 3.5mm jacks.
Interesting fact:If you sand down the ebony wooden cup on its own, it smells like a very chocolatey mochaccino. 😊
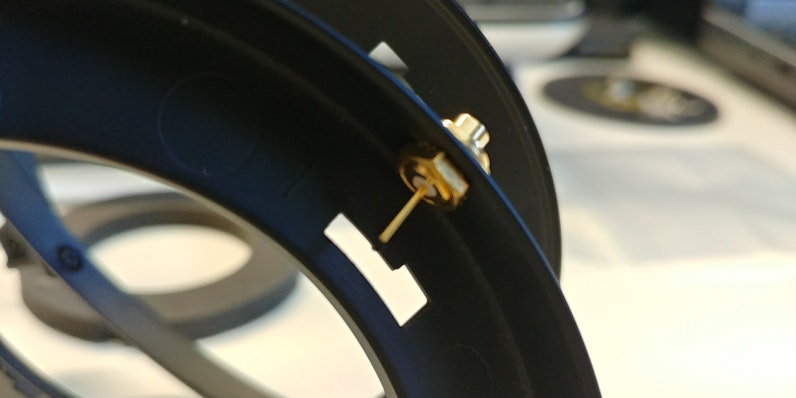
LEFT: Blue RIGHT: Pink
The driver and baffle assembly will have a coloured dot signifying whether it's the left or right driver. The brown wire is the ground lead and the adjacent coloured wire is the hot lead.
- Reattach the baffle to the magnesium frame and add the 3.5mm connector jacks. For my assembly, the jack fit snuggly through the hole in the frame originally meant for the cable. If necessary, you can widen the aperture with a metal file so the connector can fit through.
- Solder the brown ground wire to the sleeve pin.
- Solder the coloured wire to the tip pin.
PRO TIP: When soldering, high heat for a shorter period of time is better than lower heat for an extend time. I set my soldering iron to 450° C. Keep your soldering under 3 seconds. If you don't make a good joint, pull back, let it cool for a ten count, and try again. Following this will ensure you don't burn the coils on your drivers.- Reattach the wooden housing to check fit.
- If you find that you've made the cavity on the wooden housing too wide, you can use Sugru to fill the gaps. Sugru is mouldable and will harden to a tough rubber material once it cures for 24 hours.
STEP 3 - CABLE ASSEMBLY: The disconnected cable will need 3.5mm plugs to connect into the headphones. Prepare the cable by inserting the following components in this specific order before soldering everything together:- 3.5mm connector plug sleeve
- Rubber cable tension guard from STEP 1
- 3/4" length shrink tube insulator
Failing to do those steps before soldering the plug onto the cable will be a nightmare for you.STEP 4 - COMPLETE ASSEMBLY: Once all the wiring and assembly of the driver components and cables are complete, it's time to put the whole thing together and then you're done!
Here's a bigger picture of the completed modification: